Showing posts with label Free Pattern. Show all posts

Wednesday, October 13, 2010

Half Way Wrong Way Cowl

Yesterday and into this morning, I knitted two cowls.  One I used a pattern I found on Raverly, and I'll talk about it in a later post.  The other pattern is a pattern I kind of sort of made up by accident. And I love, love, LOVE it!  I couldn't be happier with the way this cowl turned out, and I'm going to share the long, sorded details with you today. Don't you just love that?!

I know you can't wait, so let's get started.

 I call this pattern the Half Way Wrong Way Cowl because as I was working on it I realized at about half way through I switched the way I was knitting up the piece.  Instead of frogging the cowl, again for the 3rd time, I decided to go with it and see what I got.  The outcome was pretty darn cool.

First, the yarn is a 100% Wool super bulky thick to thin, hand spun, hand dyed yarn that I found on Etsy.  The seller's shops is Absolute Knits, and as soon as I saw it I fell in love with the wild colors.

I noticed she doesn't have the yarn listed anymore so I obviously wasn't the only person who fell in love.


So I knew I wanted to knit a cowl with this yarn as soon as I saw it, and I at first thought I wanted to knit the other cowl I mentioned earlier with it.  I soon realized that wouldn't work.  So I tried to figure out how exactly I wanted the cowl to look.

As luck would have it, a while back I'd bought some fun, bright colored buttons and an idea started to wiedle it's way in.  I was pretty certain those buttons would match the yarn.  And if that was the case then the cowl didn't have to be a closed cowl.  I could attach the buttons and wear it in many different styles.

So that's what I did.

 I know, I know.  It seems like I've jumpped ahead of myself.  So here goes the pattern.

Half Way Wrong Way Cowl

Use a super chunky/bulky yarn of your choice.
Size 17 US or 12.75MM Needles

Cast On 11 stitches

Repeat these rows until your peice measures 10 inches.

Odd Row - Knit(K) 1 Purl (P) 1 to end of row
Even Row - P1, K1 to end of row

Once your piece measures 10 inches switch the order of your knitting.

Odd Row - P1, K1 to end
Even Row - K1, P1 to end

Once your cowl measures 20 inches Bind Off using a K1 Purl 1 bind off.

Next, using a piece of your left over material, sew on your buttons.

By doing this switch halfway through the piece, it creates a ridge. See the second photo up top there.  But if you look at the third photo, the switch gives the front of the piece a very nice cushy appearance.  Also by doing this, you don't have to worry about button holes.  The ribbed valleys gives the buttons a nice place to rest so that they pop! And you can just slip through the stitches. Viola! No button holes required.

I can see me wearing this a lot this winter.  And I can't wait!!

Thursday, October 7, 2010

Coaster Woasters

Hello there!  Well, it's been awhile yet again since I've been out to post, but you have to admit, it hasn't been as long since the previous time.  I thought a good topic for today would be about getting ready for the holidays.  And by the holidays, I really am only talking about Christmas.  Because you see, I am up to my arm pits (Yes, arm pits!) in Christmas knitting.  However, I am proud of myself.  I started mucho earlier this year than last and I'm knitting up from existing patterns and not making a new pattern up as I knit along.  This is making the process much easier.  Well so far at least.

Perhaps in another post I'll talk about some of my current projects.  But for today, I thought I'd share the projects I knitted up last year and the pattern I used.

It all started when I tried to think up a 'family' gift for my three brothers and their family.  You see, we used to draw names but then a few years back my sister in law thought it would be a better idea and cheaper to do one family gift for each family.  So that is what we have done for the past few years.  The trouble is how to keep from being boring and repeating the same gift over and over.  I thought up a remedy.  I'd knit something.

So that's what I did.  I set out to knit up some coasters to go in a basket full of coffees, teas, ciders, hot chocolate mixes etc.  Sounds cool huh?  Well, it did to me so I went with it.

So in honor of starting the homemade Christmas gift process all over again I thought I'd share with you the pattern I used last year to create these coasters that went into my families Christmas gift basket.


Coaster Woasters

1 Skein Lion Brand Thick 'N Quick Grass
1 Skein Lion Brand Thick 'N Quick Cranberry
1 Skein Lion Brand Thick 'N Quick Natural Cream

(These are the colors I used.  You can choose any contrasting colors of your liking.)

Size US 8 - 5.0 mm needles

Stitches used in this pattern are:
Garter Stitch
Yarn Over (YO)
Knit 2 Together (K2tog)

Gauge isn't really important.  You just want to make sure that your stitches are nice and tight. Which using the size 8 needles really does help with that.

CO 2 stitches


Row 1 K1, YO, K1
Row 2 K1, YO, Knit to end of row
Repeat Row 2 until you have 22 stitches on your needle.


Row 21 K1, YO, K2tog, Knit until 3 stitches remain on needle, K2tog, K1
Report row 21 until you have 2 stitches left on your needle.
Bind off


The increases and decreases with using the YO leaves the nice little openings along the sides.  Using one of your contrasting colors, weave the yarn through the holes and then tie off at the starting / ending corner to make a nice decorative bow.

I made these in sets of 4 and tied them together with a festive card that said Handmade Coasters by my name.

And there you have it.  The pattern I used this time last year to knit up nice, quick and easy Christmas gifts.  In a later post I'll show off some of my current Christmas knitting.  But for now, I think it's safe to call this blog post done.

Monday, April 19, 2010

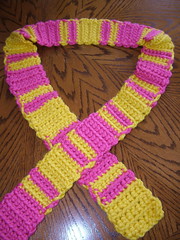
I Did It My Way Crochet Scarf

As I mentioned the other day, I created this scarf in my attempt at teaching myself how to crochet. It started out with me just wanting to learn the basic crochet stitch, or stitches since there were two basic stitches involved, the chain and the single crochet.


I call this scarf "I Did My Way Crochet Scarf" because well, I did it my way, without a clue as to what I was doing. And now I'm going to share that way with you all. I've never written up a crochet pattern before, so bear with me as I try to get this right.


I Did It My Way Crochet Scarf

Hook :
9.0 mm (M/N)

Yarn :
YA - 1 skein Lion Brand Hometown USA Pittsburgh Yellow
YB - 1 skein Lion Brand Hometown USA Honolulu Pink

Additional Materials:
Yarn needle to weave in ends

Gauge: I didn’t really check gauge on this project since I was just going with the flow.

Instructions:

With YA Ch 9

Row 1: YA starting with second st from hook sc 8 through top loop only ch 1
Repeat row 1 6 times.

**Row 7: YB sc 8 through top loop only ch 1
Repeat row 7 2 times

Row 9: YA sc 8 through top loop only ch 1
Repeat row 9 2 times

Row 11: YB sc 8 through top loop only ch 1
Repeat row 11 4 times

Row 15: YA sc 8 through top loop only ch 1
Repeat row 15 2 times

Row 17: YB sc 8 through top loop only ch 1
Repeat row 17 2 times

Row 19: YA sc 8 through top loop only ch 1
Repeat row 19 4 times**

**Repeat this alternating pattern until scarf reaches desired length

Then using YB sc 8 through top loop only ch 1
Repeat closing rows 6 times

Weave in ends.

All done!

So how’d I do in writing and relaying my first written pattern? Let me know. Also, if you happen to try the pattern out, I’d love to hear back from you.

Or if you'd rather I email you the pattern, I have it saved as PDF complete with a graphic display. I can forward. Just leave me a comment.